Hey folks!
today we will learn how to deploy a SharePoint Syntex Model on a SharePoint library in different ways. Especially, when you want to automatically deploy it on a SharePoint library, e.g. for each new project or department site, it can get a bit more complex to automate everything. Unfortunately, currently it’s not possible to deploy it using a SharePoint site template, but I will show you all other ways how to deploy it.
Short Intro into SharePoint Syntex
SharePoint Syntex is a Microsoft 365 service that uses advanced AI and machine teaching to amplify human expertise, automate content processing and transform content into knowledge. Besides many other features, you can create a model, start classifying and training your extractors to automate the metadata extraction from various unstructured documents (like contracts, invoices or receipts). The service is licensed with an add-on license SharePoint Syntex and to create a model, you need a Content Center Site within your tenant. If you want to learn more about SharePoint Syntex, please check out the Microsoft Docs.
How to manually deploy SharePoint Syntex
SharePoint Syntex Content Center
You can manually deploy SharePoint Syntex models to a library in two different ways. First, you can select a site and library right from the Content Center, after classifying your files and training the extractors. You will see a section “Where the model is applied” and you can easily select multiple libraries to deploy your model to.

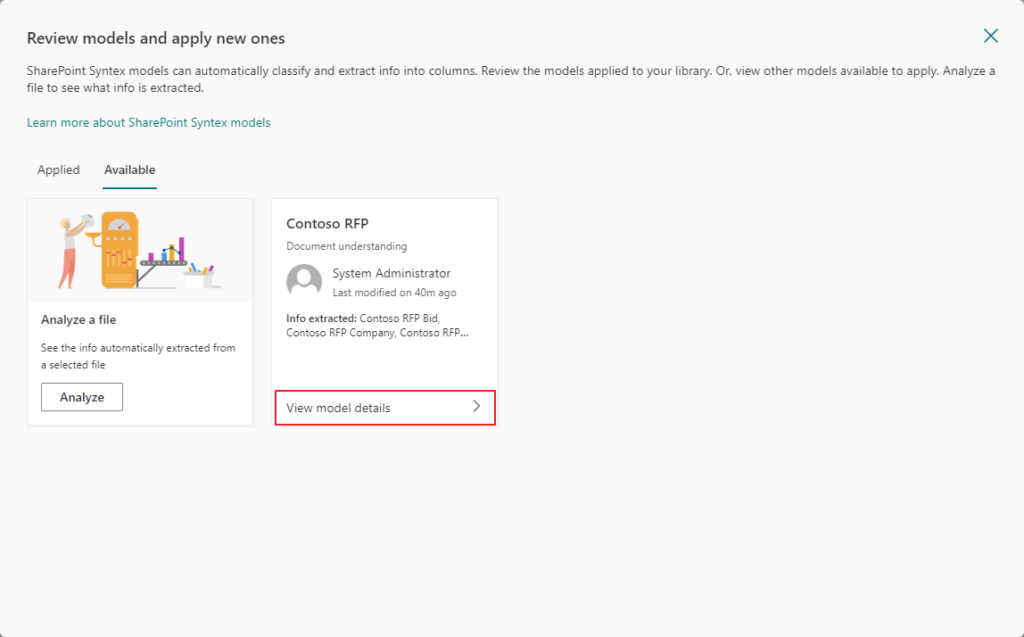
SharePoint library
The other way around is to deploy SharePoint Syntex models from a library you are currently on. Within the command bar menu, select “Automate” – “View models”. You will see all available models you can add to this library (and which are already deployed).

Select the model you want to apply to this library.
Before deploying it, you will get an overview about the configuration and extractors.

You can add multiple models to the same library, when you upload a new document, each model will check if the document fits it’s classification and then extract the information you configured within the Content Center.
How to automatically deploy SharePoint Syntex
PnP PowerShell
Probably the first way on how to automatically do stuff within your Microsoft 365 environment is using PowerShell or better using the PnP PowerShell. PnP PowerShell is a .NET Core 3.1 / .NET Framework 4.6.1 based PowerShell Module providing over 600 cmdlets. For more information about installing or upgrading, refer to PnP PowerShell.
Listing the available models in a content center
Connect-PnPOnline -Url "https://contoso.sharepoint.com/sites/yourContentCenter"
Get-PnPSyntexModel
Apply a model to a library
Connect-PnPOnline -Url "https://contoso.sharepoint.com/sites/yourContentCenter"
Publish-PnPSyntexModel -Model "Contoso RFP" -ListWebUrl "https://contoso.sharepoint.com/sites/yoursite" -List "Documents"
There are also other cmdlets available to work with SharePoint Syntex. Check them out in the Microsoft Docs.
SharePoint REST API
The last option how to automatically deploy your SharePoint Syntex model is to use the SharePoint REST API. You can use this, for example, within a Power Automate flow as I do or any other service that enabled you to send a HTTP request to SharePoint. As we already know, (currently) it’s not possible to deploy a Syntex model using SharePoint site templates, but you could trigger a Power Automate flow from a site template and this flow will deploy the Syntex model to your new site.
First we need to collect some information we need later:
- Target site url + server relative url
- Target library server relative url
- Unique model id
- Content center url + server relative url
Get target site url + server relative urls
You can use the following syntax to get the site url or just copy it from your browser address bar, like:
“https://contoso.sharepoint.com/sites/SiteName”
from this you can already derive the server relative url:
“/sites/SiteName”
Same works for the Target library server relative url:
“/sites/SiteName/Shared%20Documents”
Get content center url + server relative url
If you don’t know the Content Center url, as an administrator you can open the Microsoft 365 admin center, select
“Settings” – “Org settings” – “SharePoint Syntex” – “Document understanding” – “Content center address”
and click on the link to open the content center. Otherwise, just open a SharePoint site library, click on
“Automate” – “View models”,
select the model you want to apply and click on “View model details” – “Manage model” to get to the content center. Just copy the address from the browser address bar (see image below). As above, you can derive the server relative url from the url.
Get unique model id
To get the unique model id you can either open the Content Center and select the model you want to deploy, you will find the model id within the browser address bar or use the PowerShell cmdlet “Get-PnPSyntexModel” from above.

Power Automate flow action
After you got all information, you can configure the Power Automate flow action:
Site Address: <Target site url>
Method: POST
Uri: /_api/machinelearning/publications
Headers: Accept: application/json;odata=verbose
         ContentT-Type: application/json;odata=verbose;charset=utf-8
Body:
  {
    "__metadata": {
      "type": "Microsoft.Office.Server.ContentCenter.SPMachineLearningPublicationsEntityData"
    },
    "Publications": {
      "results": [
        {
          "ModelUniqueId": "<unique model id>",
          "TargetSiteUrl": "<Target site url>",
          "TargetWebServerRelativeUrl": "<Target server relative url>",
          "TargetLibraryServerRelativeUrl": "<Target library server relative url>",
          "ViewOption": "ListViewAsDefault"
        }
      ]
    },
    "ModelSiteUrl": "<Content center url>",
    "ModelWebServerRelativeUrl": "<Content center server relative url>",
  }
Summary
As you can see, there are multiple ways how to deploy a SharePoint Syntex model to a document library with one or multiple SharePoint sites. If you want to automate it more, you can either use the PowerShell cmdlets, if you maybe want to deploy it to existing sites within your tenant or if you are using SharePoint site templates, you can trigger a flow, that deploys it while creating a new SharePoint site.
Thanks for reading, I hope you liked it and it will help you!
Marvin
Schreibe einen Kommentar