Hey folks,
This post will be a brief overview of how to trigger a Power Automate flow, which is not inside the default environment, from SharePoint.
As you may have noticed, if you create a flow using the SharePoint triggers “For a selected item” or “For a selected file” within a non-default environment, you cannot find it within the “Automate” option inside a SharePoint list or library.
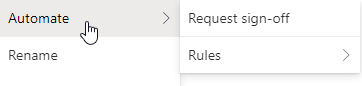
When hovering over / clicking on “Automate”, in the background the method “SyncFlowInstances” is triggered and returns a list of flow instances from the default environment, attached to the list and available by the current user.
But as flows from other environments are not returned (yet?), we need to use a workaround:
Create a SharePoint text column

First, we need to create a new SharePoint column within the library. You can call it as you like, the name is not important, we just need to have a column that can be formatted and show the “trigger button”.
Format the column

Next, we need to format this new created column. Switch to the advanced mode within the “Format column” window.

Inside the advanced mode, we can add some custom JSON, you can see a simple example script below.
   {
       "$schema": "https://developer.microsoft.com/json-schemas/sp/v2/column-formatting.schema.json",
       "elmType": "button",
       "customRowAction": {
           "action": "executeFlow",
           "actionParams": "{\"id\": \"<Flow ID>\"}"
       },
       "attributes": {
           "class": "ms-fontColor-themePrimary ms-fontColor-themeDarker--hover"
       },
       "style": {
           "border": "none",
           "background-color": "transparent",
           "cursor": "pointer"
       },
       "children": [
           {
               "elmType": "span",
               "attributes": {
                   "iconName": "Flow"
               },
               "style": {
                   "padding-right": "6px"
               }
           },
           {
               "elmType": "span",
               "txtContent": "<Display Name>"
           }
       ]
   }
Using the action “executeFlow” and the parameter of the Flow ID, we are able to trigger a flow.
Get flow Identifier
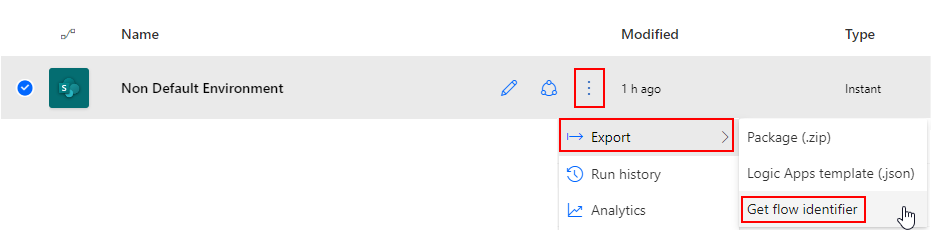
To be able to trigger the flow, we need to unique identifier of the flow we want to trigger within our non-default environment. To get this, open Power Automate, click on the three dots – Export – Get flow identifier and copy the value into your clipboard.
Add identifier to code
Next, you need to replace the copied value where the “Flow ID” value currently is as a placeholder:
   {
       "$schema": "https://developer.microsoft.com/json-schemas/sp/v2/column-formatting.schema.json",
       "elmType": "button",
       "customRowAction": {
           "action": "executeFlow",
           "actionParams": "{\"id\": \"v1/00000000-0000-0000-0000-000000000000/00000000-0000-0000-0000-000000000000\"}"
       },
       "attributes": {
           "class": "ms-fontColor-themePrimary ms-fontColor-themeDarker--hover"
       },
       "style": {
           "border": "none",
           "background-color": "transparent",
           "cursor": "pointer"
       },
       "children": [
           {
               "elmType": "span",
               "attributes": {
                   "iconName": "Flow"
               },
               "style": {
                   "padding-right": "6px"
               }
           },
           {
               "elmType": "span",
               "txtContent": "Start flow"
           }
       ]
   }
You should also replace the “Display Name” value to something more speaking for the users:

e.g., you can use the same name as the flow or just “start flow”.
Run flow

Click on the link of an item to open the run flow dialog and start the flow.
Thanks for reading, I hope you liked it and it will help you!
Marvin
Danke; schreibe von den Staaten, aber es ist mir und meinem Team sehr behilflich!
now I understand why we have flow identifier, it work perfectly, thanks